| | | | | | | | | |
| Alaska's Boreal Sasquatch & Marked Hominid Authority since 2005. |
| SASQUATCH TRACKER |
| . |
| Preserving tracks begins before making the casts. You need to do your best to keep other people and animals out of the track area. Protect your evidence. Treat it the way you would treat a crime scene! Primary Measurements: Once you begin the casting process, the track will never be the same as it was when the subject left it. The first measurement to take is of the track itself. Measure the length at the longest point (from heel to toe). Then measure the width at the widest point. The widest point is usually just behind the toes. Take lots of photos from all different angles before casting. Secondary Measurements: Most people stop after taking the primary measurements. This is most likely due to inexperience. It's pretty easy to concentrate on the first track discovered, but the Sasquatch was walking through the area, not taking giant hops. After you find one track, apply a bit of persistence because there will be more. After the Cast: Once a cast has been made and ample time has gone by for the cast to set up, simply remove it from the ground. As tempting as it may be, do not clean it! Carefully wrap it in newspaper or other suitable padding and place it into one of your of your cardboard boxes. When you return to your base camp or home, spread out some clean butcher paper on a table and carefully unwrap your cast. Carefully examine it before cleaning. The reason for this is that there maybe other evidence such as hair or tissue in the debris attached to the cast. The reason for examining on the butcher paper is to help you identify this evidence as you begin to clean. A dirty black hair is not going to be easy to see on some old newspaper. |
| Measuring & Casting: |
|
| Casting Kit: |
tape
|
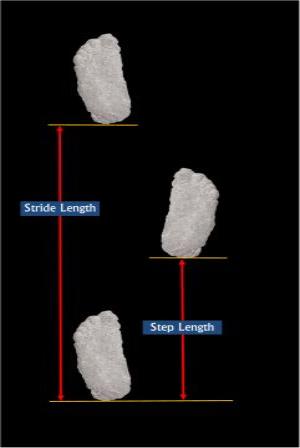
| STEP LENGTH: Measured from the heel of one foot to the heel of the other foot Measurements can also be made from the forward most toe of one foot to the forward most toe of the other foot. Which ever method of measuring you pick, you must stay consistent to avoid error. Some trackers will refer to this as the pace length. STRIDE LENGTH: Measured from heel to heel. This is the length of the step. If one stride has a constant longer or shorter length, consider that the subject may have deformities or an injury. Most grown men can have a stride length of 36 inches without effort. Look for deep heel and toe impressions. Deep impressions that look like a man trying to step further than normal may indicate a hoax. Follow the tracks as far as you are able. Even the best hoaxed tracks will end somewhere. (Brown, T. 1989. Tom Brown's Field Guide to Nature and Survival for Children. Berkley Publishing Group, New York, New York.) |
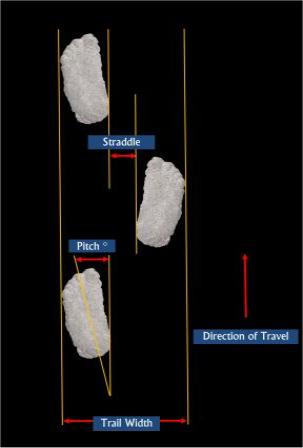
| DIRECTION OF TRAVEL: Sometimes the direction of travel will be obvious. If not, look for sequential tracks. Lay mason's twine between tracks to act as a reference line that will be visible in your photos. PITCH: Measured in degrees from direction of travel (your mason's twine). This is the degree in which the track will angle away from the line of travel. Draw an imaginary line bisecting the track at the widest point along the long axis (toe to heel). Now draw an imaginary line parallel to the direction of travel line. Measure the angle where both of these lines meet. If the pitches vary from side to side, it may indicate a deformed or injured foot. Pitch may also reveal a dominate side. STRADDLE: Measured from instep to instep. There is either zero straddle (one foot directly in front of the over) or positive straddle. If you find left tracks on the right side of the direction of travel, something is wrong. Examine the tracks more closely. TRAIL WIDTH: Measured from the outside of track to the outside of opposite track. Sasquatch Tracker uses this dimension to calculate the width of hips of the individual making the tracks. (Brown, T. 1989. Tom Brown's Field Guide to Nature and Survival for Children. Berkley Publishing Group, New York, New York.) |
| Field Kit: |
| Measuring groups of tracks: |
|
| Surveillance Equipment: |
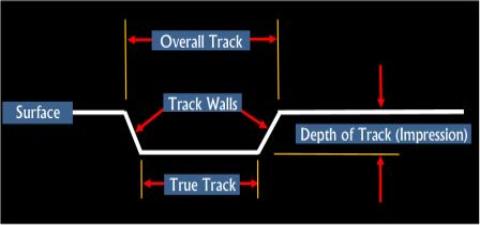
| General track notes: When a track is made, the heel slides into the ground, makes the impression, then pulls out. You will never find a track that registers straight down. There will always be some angular surface of the impression. If you find tracks registering straight down, like those that would be made with a stamp, suspect a hoax. The softer the soil, the greater the sides of the impression will be. That is the "overall track". Don't let this fool you. Be sure to measure the true track and not the size of the overall track. (Curtis, R. n.d. OA Guide to Animal Tracking. Princeton University) |
| Measuring individual tracks: |
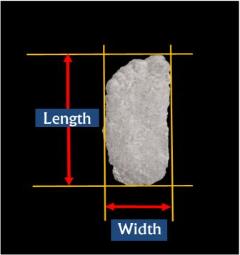
| Dimensions: There seems to be have been some confusion in the way the dimensions of tracks are recorded. While speaking to another Sasquatch Field Researcher, the individual kept referring to the length of a particular track as being 8 inches. It just did not make sense. Tracks are supposed to be longer than that. That's why they are called "Bigfoot". After further discussion, the individual was mistakingly referring to the width. Just so we are all talking about the same thing: Length: This is measured from the forward most toe to the heel. Width: This is measured from one side of the track to the other across the widest point. |

| TRACKER NOTES: EQUIPMENT, TRACK MEASUREMENTS & CASTINGS CONSIDERATIONS |